- 3 Minutes Wednesdays
- Posts
- 3MW (Dynamic UI with R-Shiny)
3MW (Dynamic UI with R-Shiny)
Albert Rapp
May 22, 2024
Guten Tag!
Many greetings from Munich, Germany. Today we talk about dynamic UIs. You see, you rarely want to show your Shiny app’s full user interface from the beginning and dynamic UIs help you with that.
For example, think about those interactive questionnaires you’ve likely already seen. You know, the ones where you have to answer a question and then, depending on your answer, another question pops up. In these kinds of cases, you will have to think about how to generate the user interface dynamically.
And in Shiny there are a couple of ways to generate dynamic UIs. Let’s talk about three ways to do that. But first, let’s talk about this week’s announcements.
Interactive maps with R
Creating interactive maps with R is a simple 3-step process:
Get the geographic data (with
{giscoR})Create a static chart (with
{ggplot2})Add interactivity (with
{ggiraph})
Need more details? In my newest tutorial I show you every step of the way:
As always, all code that you see here can be found on Github.
Insert and remove UI
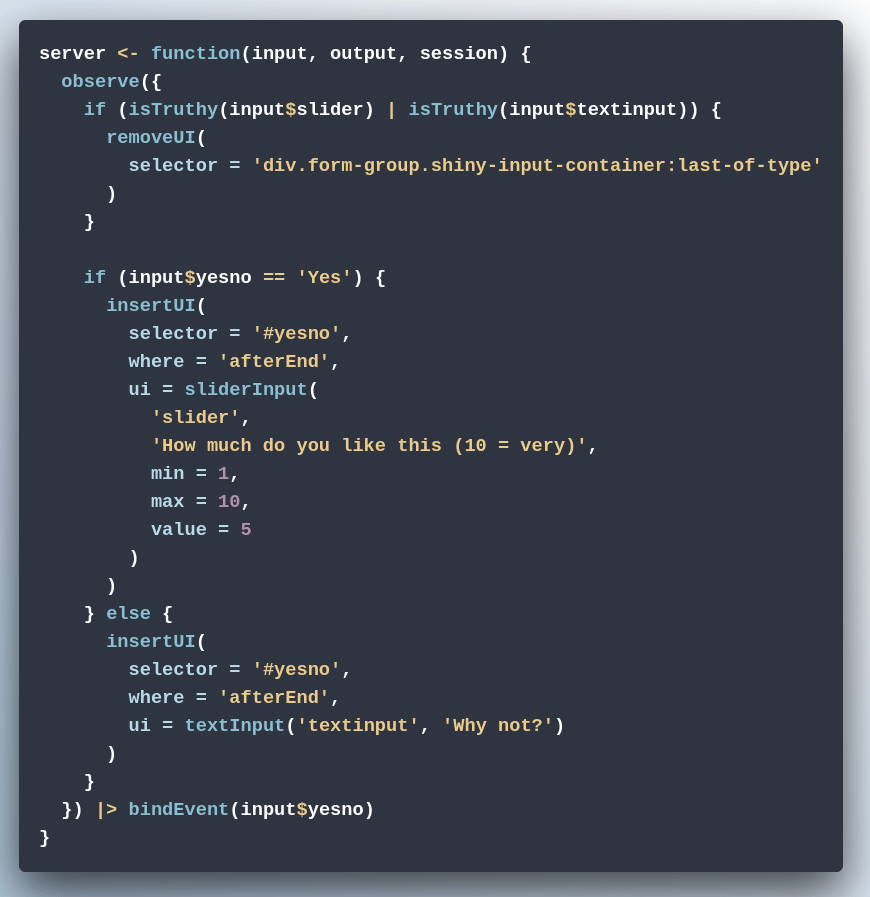
The first way to create a dynamic UI experience is pretty easy. Let’s set up a simple example. Let’s go with a UI that has a radio button with the options “Yes” and “No”.


Depending on if “Yes” or “No” is selected, you want to throw in some specific part into your user interface. In these cases, you can use the insertUI() function to just throw in the next part at a specific location.


Here, new content is added every time the radio button changes values. This might not be exactly what you want. In that case, you will have to use the removeUI() function to remove the previously added content.
This requires two things:
The
isTruthy()function to check if one of the additional inputs exists. This function is a Shiny specialty. It returnsTRUEif the input is notNULL,NA,FALSE, or an empty string.The selector of the element you want to remove. That’s quite complicated since Shiny wraps inputs like the slider or text input into all kinds of additional HTML containers.
All in all, that makes removeUI() complicated to use. However, it’s still a powerful tool to have in your toolbox. So let me show you the solution and then let me show you a much simpler way to deal with this particular use case.

Render a placeholder
As we’ve just seen, insertUI() and removeUI() give you great powers but can be quite complicated to use. If you only want to show different UI elements in a specific place, the renderUI() and uiOutput() pair have everything you need. See, in the UI, you just have to include a UI output from the start as a placeholder for this particular user interface.

Then, in the server function, you will have to use the renderUI() function to generate that.

And that way, you get the exact same result as before but with simpler code.

Update your UI
Both of the previous approaches render whole user interfaces. This means that everything inside of this user interface is re-rendered upon change of the change of the radio button. This can sometimes be slow or inefficient. Luckily, depending of your use case, this bottleneck can be avoided.
Imagine that you want a slider input to be moved to a specific value after a button is clicked. In that case, you could use a sliderInput and inside your server function, use the updateSliderInput function and tie all of that to an observer.


Compared to renderUI(), the updateSliderInput() approach is more efficient because it updates the value of the slider on the user’s computer (client-side). If you use renderUI(), everything will first go to the server, be rendered there, and then go back to the user, which is slower.
So, these were three ways to deal with dynamic user interfaces in Shiny. Next week, we’ll dive into Shiny modules which is a MUST-KNOW concept for any Shiny developer. And if you have any questions don’t hesitate to reply to this mail or contact me on LinkedIn.
See you next week,
Albert 👋
Enjoyed this newsletter? Here are other ways I can help you:

.png)

Reply